Here is a short demo in case you know nothing of Google AIY (Aritificial Intelligence Yourself).
If you prefer you can watch the full instructional video on YouTube.
In mid-2017 Google released a kit for use with the Raspberry Pi under the AIY brand, it came with a Voice HAT, Voice HAT microphone board, a 3″ speaker, a cardboard box, some wires and some lovely arcade buttons. This kit was surpassed with the V2 release that used the Pi Zero WH.
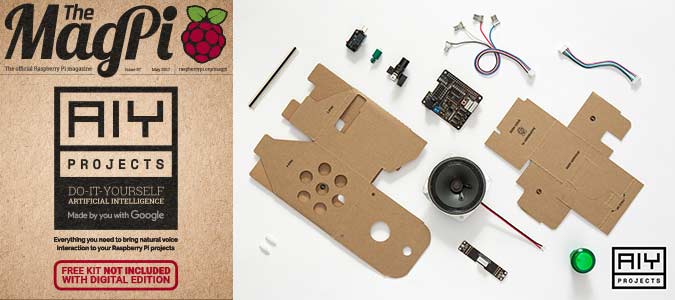
But you don’t need the kit to take advantage of the image that they have provided. All we need to do is make a few changes to some configuration files to get the Google AIY to work without the Voice Hat stuff.
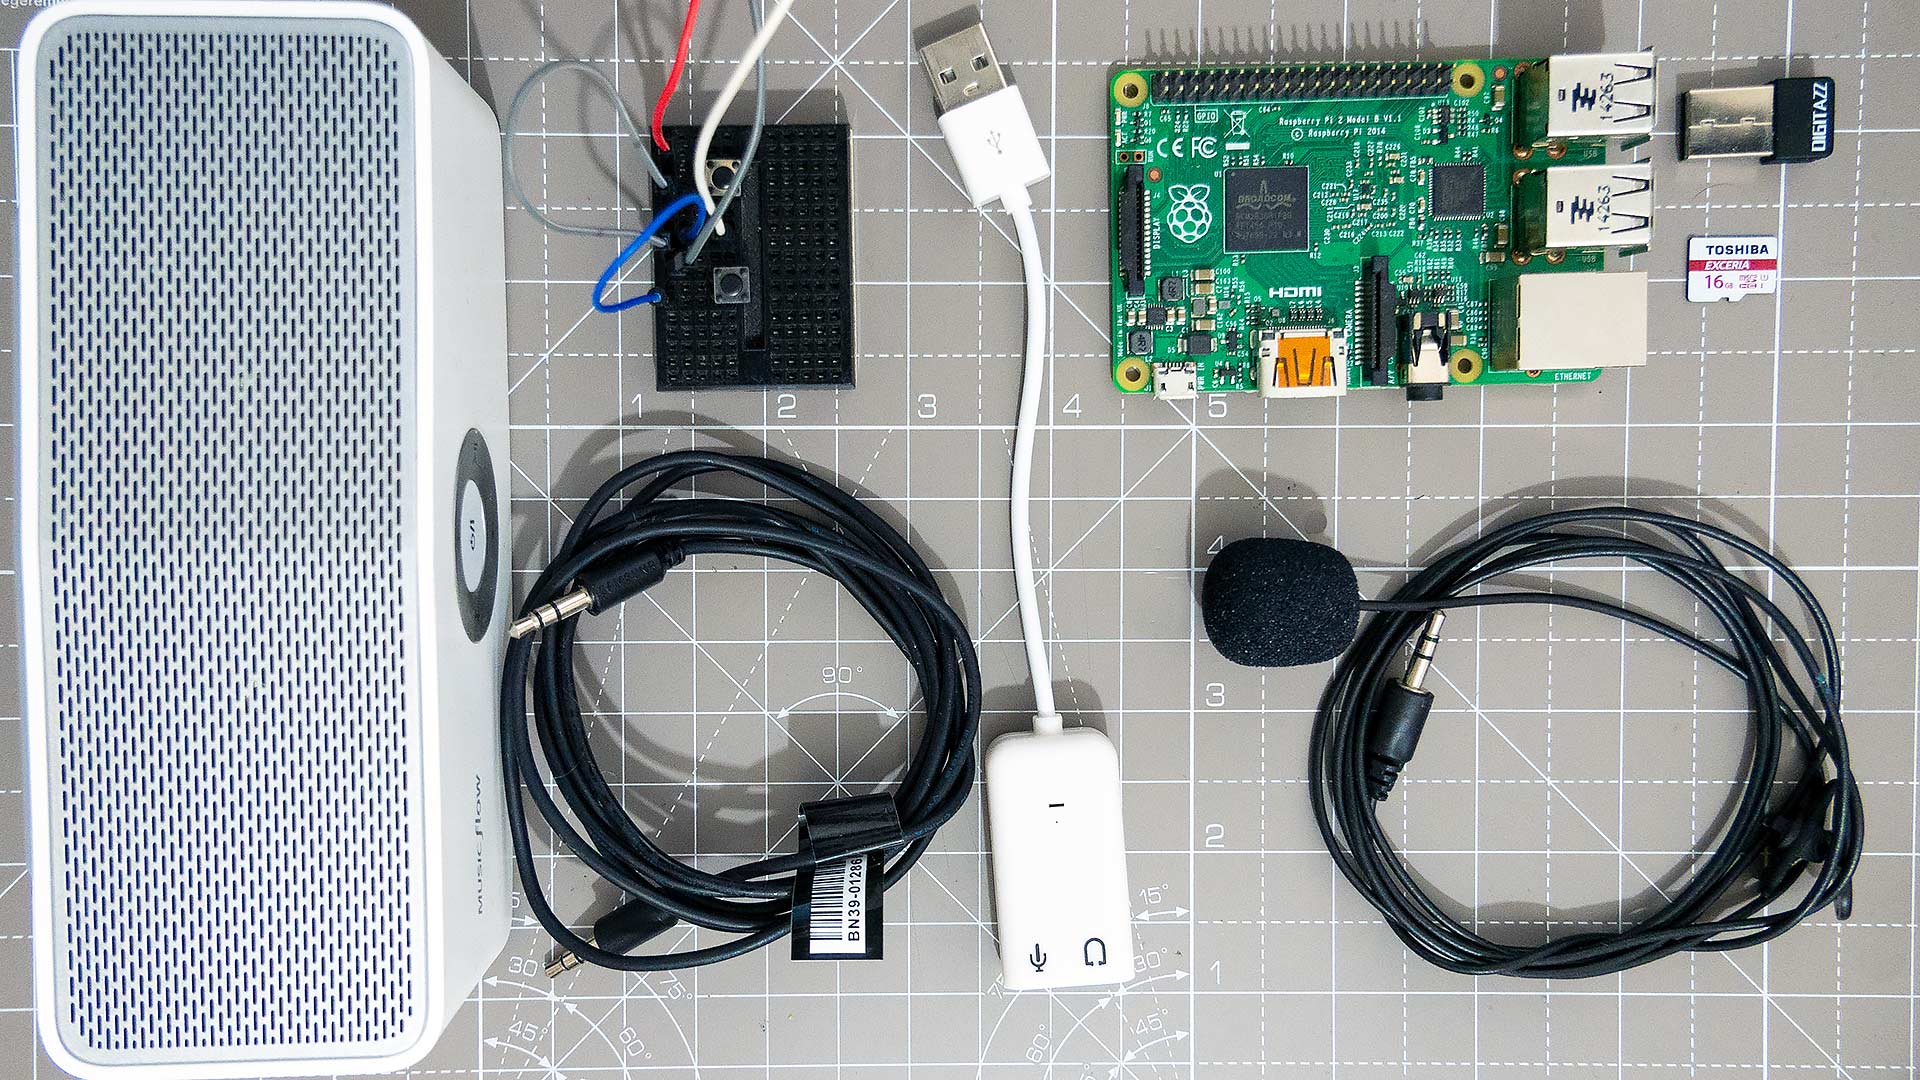
I will be using a USB sound card (This is the one I bought from Amazon UK – US) instead of the Voice Hat along with an external speaker and a 3.5mm jack microphone. Wanna follow along? Take a look below.
Contents
What you will need
-
- Raspberry Pi 2/3 (Amazon UK – US)
- Micro-SD card (I would recommend a minimum of 8GB)
- External powered speaker (Anker make a fairly good one – Amazon UK – US but any will do)
- USB soundcard (This is the one I bought from Amazon UK – US)
- WiFi dongle or Ethernet connection if using the Pi 2
- A breadboard
- A momentary button
- A Google Account (This is so you can make use of the Google Assistant API)
Where to begin
I will be using Windows for this process, steps are similar but Linux and Mac users will have to muddle through I am afraid.
Step 1 – Building Blocks
This is probably a little obvious to most of you, connect all your components together but hold off on power for now.
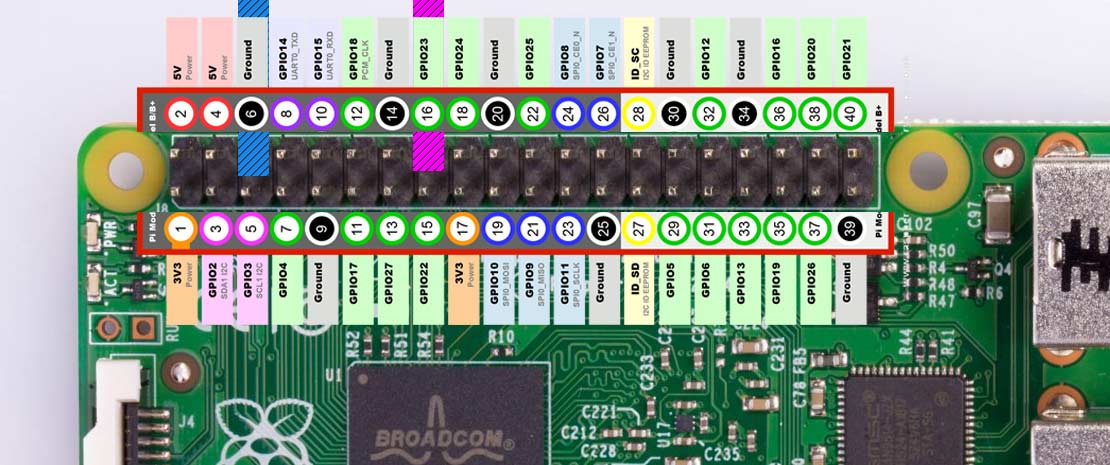
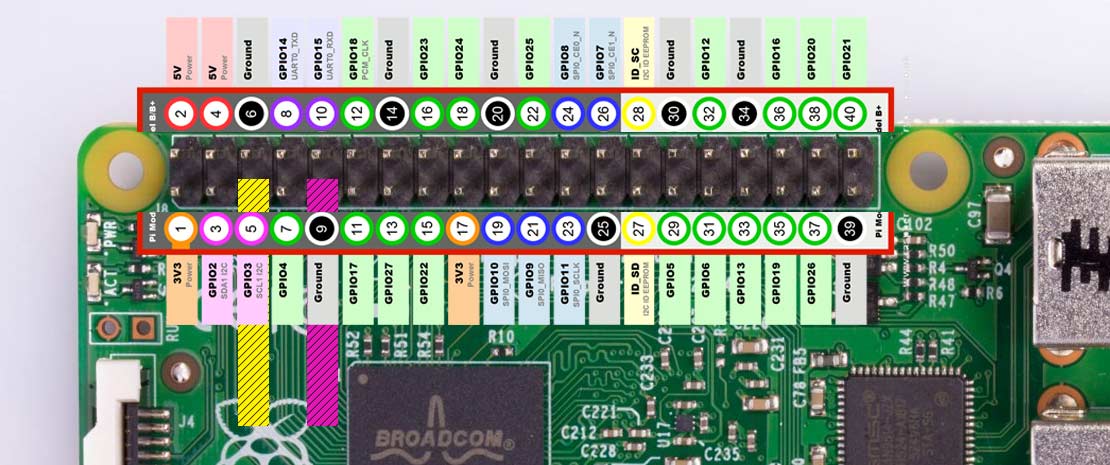
You will need to connect the button up to GPIO23, you can still use this without the button if you don’t have one. Using your breadboard, connect one side of your button to GPIO23 and the other side to GND, the pins are mark in pink and blue on the image.
Step 2 – Getting Software
Download and burn the image to your SD card, it will be zipped up in a Tar format that you can extract with 7-Zip and burned with something like Win32DiskImager or you can burn it directly to you SD card using Etcher.

Step 3 – Getting Connected
Easy
Here is where things get a little messy, depending upon what you have available. If you have a monitor, keyboard and mouse available then you can set up your WiFi in the GUI environment that this image will boot straight into. This is likely the easiest method to get up and running quickly. I won’t go into the specifics here, setting up the WiFi should be easy as Pi in the GUI these days. You can achieve everything in this tutoral through the GUI interface but I am going to go the rest of the way with a terminal window.
Medium
If you don’t have want to mess up your desktop setup or you are using an all-in-one, you should connect through Ethernet to your home network. This is my preferred method to set up my Raspberry Pi’s.
Hard
Grab yourself a USB to serial converter, and hook it up to the Pi’s RX and TX lines. You will still need an internet connection so this is not the best route to take but it can get you in to connect up your WiFi module.
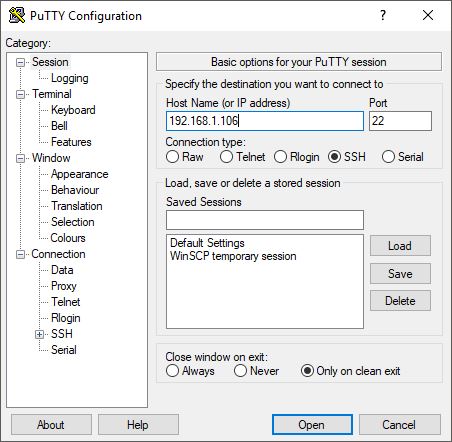
We are going to connect to the Pi for the first time using SSH or through a serial interface. To do this I am going to use Putty but feel free to use your terminal/serial console of choice, there are even browser based ones these days.
When you open Putty you can choose between SSH or Serial (choose Serial if you are using that interface and select the correct COM port) at this point you will need to know the IP address of your Pi if running the SSH route.
Setting up the software
Now you will need to create a project on the Google Cloud Platform the instructions on AIY are great for this.
Time-saving tip
You can copy these commands by selecting them and copying with
ctrl-c then paste into Putty with a mouse right-click.
General settings
Login to your Pi, the username is pi and the password will be raspberry
First we’ll update. This can take ages (30 minutes) but it is important to make sure your Pi can talk to your hardware, it may need newer drivers. Runs these commands separately:
sudo apt-get update

sudo apt-get upgrade

sudo reboot
Second, let’s modify some settings in the Raspberry Pi Software Configuration Tool:
sudo raspi-config
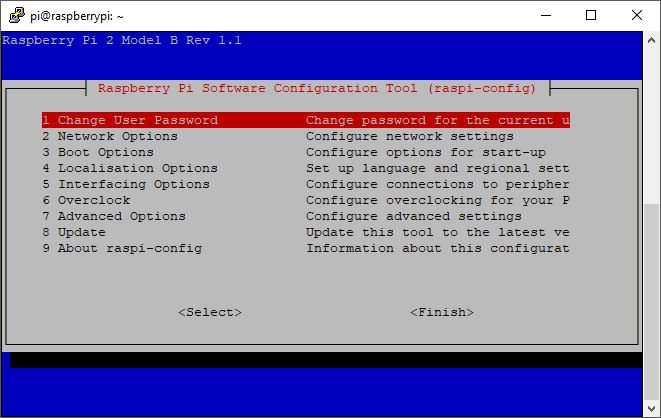
(Optional) 3 Boot Options –> B1 Desktop / CLI
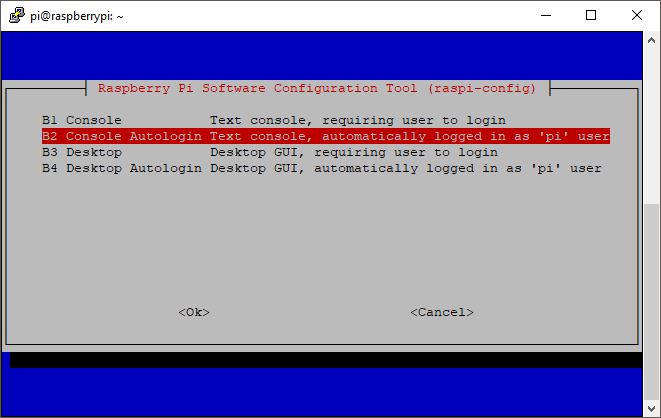
Select Console Autologin
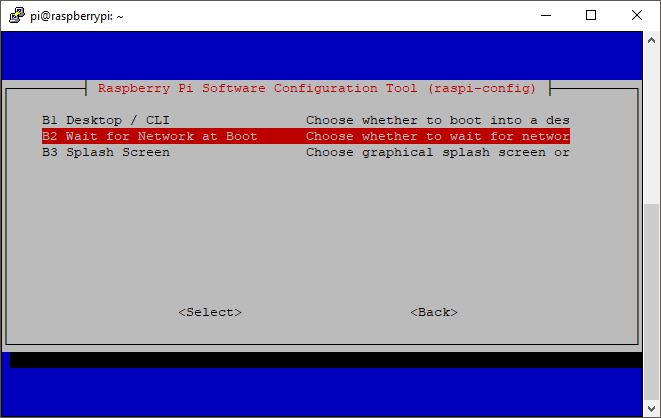
Now jump back and select Wait for Network at Boot
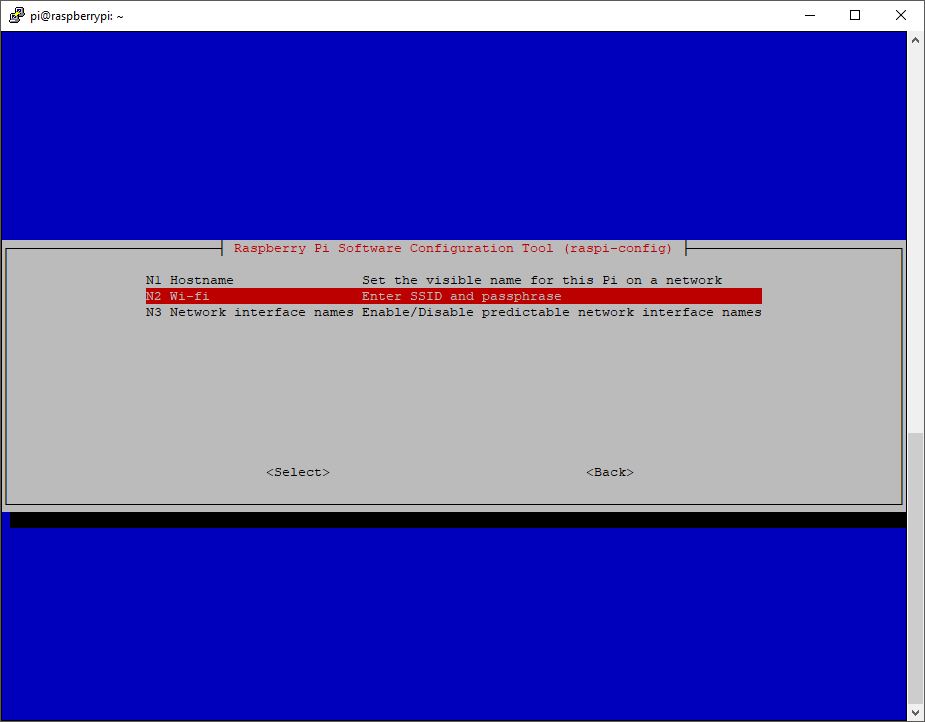
Now under 2. Network Option we will need to connect to WiFi if you are using it. You will need to know your home network SSID (The name that pops up when searching for WiFi) and the password.
Edit audio settings and test
Now we need to delve into some of the audio configuration files, these are used by the Pi (Specifically ALSA) to determine what device to use as the default for audio input and output.
You will need to run two commands which will open files in the terminal, delete the contents of that file and paste in the Audio Configuration code listed below.
Command 1
sudo raspi-config
sudo nano /etc/asound.conf
Command 2
sudo nano ~/.asoundrc
Audio Configuration code
This code tells the OS which card you want to use, here it is specified as a USB PnP Sound Device. If your USB sound card reports to the OS differently you can alter the title, use the command cat /proc/asound/cards to see how your appears.
options snd-usb-audio index=1
pcm.!default {
type hw
card 1
}
ctl.!default {
type hw
card 1
}
Next let’s change some of the ALSA configuration files so it always uses our default device (we specified that it would be device 1)
sudo nano /usr/share/alsa/alsa.conf
Now find the section that contains the following, it is on page 2:
#defaults.ctl.card 0
#defaults.pcm.card 0
Replace those sections with:
defaults.ctl.card 1
defaults.pcm.card 1
Now lets go in an change our volume settings. Type alsamixer to bring up this window.
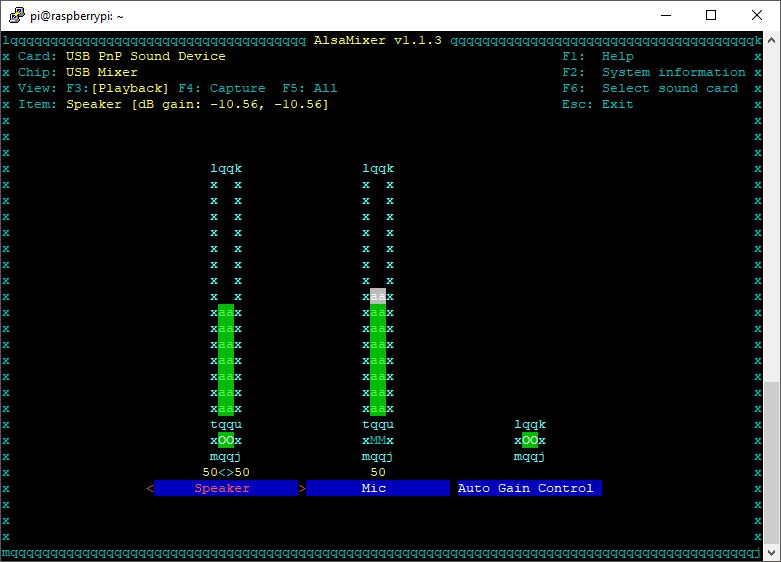
I changed mine so that they were at 50% for both speaker and Mic, you can navigate to your devive with F6. Once you exit you can store those settings with the following command:
sudo alsactl store
Now let’s reboot and see it our changes have take effect:
sudo reboot
Let’s test our audio now, to do that we are going to record from the microphone and play it back through the speakers.
This command will record audio through your microphone for 5 seconds:
arecord -d 5 -f S16_LE -r 44100 -t wav they_hear_me_recording_they_hating.wav
This command will play back what you have recorded, hopefully you will hear whatever you recorded through your external speaker:
aplay they_hear_me_recording_they_hating.wav
Enable Google Cloud stuff
You will need to grab some credentials in order to work with the Google Assiatant. Make sure you have a Google Account and you are logged in on your PC.
Go to the the Google Cloud platform website and create a project, make sure you select/activate Google Assistant
Next you need to grab some credentials for an OAuth 2.0 client once you have configured your ‘app’ you can download them from the credentials list. This will be a JSON file.
Now we need to get that onto the Pi, the easiest way is just to create a file in the terminal, open the downloaded file on your PC and copy and paste the contents to the terminal window inside the JSON file we will create:
sudo nano /home/pi/assistant.json
Now to activate!
cd AIY-voice-kit-python
The run this:
src/examples/voice/assistant_grpc_demo.py
It is going to ask you to visit a website, bit of a pain because copying the URL from the terminal will close the Python script. Copy the long URL and paste it into your desktop browser and follow the authorisation steps to get your key. Copy the response key from your browser and then run that command again in the terminal, this time you can paste the response in and it will activate your device.
Getting it to run on boot
Copy this example src/examples/voice/assistant_library_with_button_demo.py using this command:
cp src/examples/voice/assistant_library_with_button_demo.py src/main.py
Now we need to create a service, this is something that runs at boot and remains running. To do this we need to create a ‘service’ file that describes our service, the environment it will run in and the location of the Python file. We have called out file main.py but you can call it what every you like, just be sure to change it in the service too.
Lets begin by creating the file, we will move it later.
sudo nano pi-assistant.service
Now copy the code below and paste it into your terminal.
Description=Pi Google Assistant
[Service]
Environment=XDG_RUNTIME_DIR=/run/user/1000
ExecStart=/bin/bash -c 'python3 -u src/main.py'
WorkingDirectory=/home/pi/AIY-projects-python
Restart=always
User=pi
[Install]
WantedBy=multi-user.target
Now that we have created our service file we will need to move it to the right folder with this command:
sudo mv pi-assistant.service /lib/systemd/system/
Next we will need to enable the service so that it will work on boot with this command:
sudo systemctl enable pi-assistant.service
At this point I had a few problems with the user (Pi) being able to run the script, now the next set of commands are not entirely necessary but if you get permission errors with your service this should solve them:
Run them one at a time.
sudo chown -R pi /home/pi/.config/pulse
chmod 755 /home/pi/.config/pulse
sudo service pi-assistant start
If all has gone well and once your Pi has fully booted, you should just be able to press the button or call out ‘Hey Google’ to speak to the assistant.
If it hasn’t and your service doesn’t start, run these commands separately and then reboot.
chown -R pi /run/user/1000
chmod 755 /run/user/1000
What to do next?
Adding a power button for a headless setup is really useful to safely shutdown the pi and to reboot it.
I have implemented rpi-shutdown from Halofx on GitHub and it is working great. One press of the button will shutdown the Pi and once shutdown a second press will reboot it. To get this set up we’ll need a button on GPIO 3, I have marker the pins for you:
Download the code from GitHub and SFTP it over to your Pi or just create a new file with sudo nano /home/pi/shutdown_pi.py and paste the code in.
Now lets edit a file which will run our script at boot, type – sudo nano /etc/rc.local
You will see a file that looks like this:
#!/bin/sh -e
#
# rc.local
#
# This script is executed at the end of each multiuser runlevel.
# Make sure that the script will “exit 0” on success or any other
# value on error.
#
# In order to enable or disable this script just change the execution
# bits.
#
# By default this script does nothing.

# Print the IP address
_IP=$(hostname -I) || true
if [ “$_IP” ]; then
printf “My IP address is %s\n” “$_IP”
fi

exit 0
No you will need to add our Python file to rc.local file like this:
#!/bin/sh -e
#
# rc.local
#
# This script is executed at the end of each multiuser runlevel.
# Make sure that the script will “exit 0” on success or any other
# value on error.
#
# In order to enable or disable this script just change the execution
# bits.
#
# By default this script does nothing.

# Print the IP address
_IP=$(hostname -I) || true
if [ “$_IP” ]; then
printf “My IP address is %s\n” “$_IP”
fi
sudo python /home/pi/shutdown_pi.py &
exit 0
Hopefully and there are no guarantees, you should be up and running. Audio configurations can be fiddly, Python and Linux are quite sensitive to syntax and spacing for commands, you may have a very different USB sound card to me, there are lots of things that can make you efforts fail. I am happy to help in the comments or on YouTube but I am by no means a Linux expert.
Problems?
Yeah, unfortuately that is pretty likely, things can go wrong. Often times it is a case of going back and repeating some of the steps which change settings, permissions or just plain starting again.
- Run the command speaker-test to see if you get output on your speakers
- You service isn’t running! Run the command sudo service pi-assistant status to see what error message it is flagging up. If it is to do with failing to create a directory repeat the chmod and chown steps
- Python is sensitive to spacing and specifically tabs, make sure your code looks like it does above
- My audio output is really low! Try ‘Hey Google, what’s the volume?’ then set is higher with – ‘Hey Google, set volume to *1-10 or 0-100%*’
I got this error when I ran
src/examples/voice/assistant_grpc_demo.py
everything had gone great until then what is wrong thanks
Traceback (most recent call last):
File “src/examples/voice/assistant_grpc_demo.py”, line 54, in
main()
File “src/examples/voice/assistant_grpc_demo.py”, line 33, in main
assistant = aiy.assistant.grpc.get_assistant()
File “/opt/aiy/projects-python/src/aiy/assistant/grpc.py”, line 80, in get_ass istant
credentials = aiy.assistant.auth_helpers.get_assistant_credentials()
File “/opt/aiy/projects-python/src/aiy/assistant/auth_helpers.py”, line 132, i n get_assistant_credentials
return _try_to_get_credentials(credentials_file)
File “/opt/aiy/projects-python/src/aiy/assistant/auth_helpers.py”, line 123, i n _try_to_get_credentials
credentials = _credentials_flow_interactive(client_secrets)
File “/opt/aiy/projects-python/src/aiy/assistant/auth_helpers.py”, line 78, in _credentials_flow_interactive
credentials = flow.run_console()
File “/usr/local/lib/python3.5/dist-packages/google_auth_oauthlib/flow.py”, li ne 364, in run_console
self.fetch_token(code=code)
File “/usr/local/lib/python3.5/dist-packages/google_auth_oauthlib/flow.py”, li ne 239, in fetch_token
kwargs.setdefault(‘client_secret’, self.client_config[‘client_secret’])
KeyError: ‘client_secret’
Hi James, It looks like you need to have a go at the credentials section again, no harm in running it again. KeyError: ‘client_secret’ tells me that it cannot read you assistant.json file properly.
hola a mi tambien me ha salido lo mismo. he vuelto hacer las credenciales y no me hace nada. todo me funciona menos eso… como hago la configuracion de credenciales??
I am also facing the same problem. you got any solution ??
Is there anyway to add a light indicator and an audial feedback when you say “ok google”
Your instruction were very clear. Thank you sooo much!
Sure, you can use the RPi.GPIO to turn on an off LEDs. You should be able to play WAV files via aplay or VLC if you wish. I imagine aplay is probably easier. You could put it all in the conditional statements within the main python program. For example, I use the EventType.ON_ALERT_STARTED flag from AIY to tun set a GPIO pin high.
You can do the wav file playing within Python pretty easily, and better than calling an external program for most purposes.
I have a program that runs on my PC, and alerts me with a sound clip when a remote embedded system hiccups. The code is pretty simple. At the top:
import pygame
import wave
To set up the player:
try:
waver = wave.open(Restart_sound_file_name, mode=’rb’)
sample_rate = waver.getframerate()
num_channels = waver.getnchannels()
waver.close()
pygame.mixer.pre_init(frequency=sample_rate, channels=num_channels)
pygame.init()
self.restart_sound_exists = 1
# print (‘Sound initialized’) #debug
# sys.stdout.flush()
except:
print sys.exc_info() #DEBUG
tkMessageBox.showinfo(“Uh-oh!”, Restart_sound_file_name + ” doesn’t exist, or is a bad .WAV!”)
You’d want to handle the exception a little differently if you’re not running a GUI. Restart_sound_file_name is passed as a command line parameter, so I have to make sure that I didn’t mistype it before using it. Less paranoia _may_ be okay if you’re building a production package and you’re “certain” it’s okay 😉
To play the sound:
pygame.mixer.music.load(self.alert_sound_file_name)
pygame.mixer.music.play(0)
Note that my alert sounds are ones that I generated with the same sample rate and in mono. If you’re using multiple sounds with different sample rates and/or number of channels, you probably need to reinitialize the mixer for each.
When asking the assistant to call me by my name, it replies that it does not have permissions set in the assistant settings to allow it to do so… It canot say my name or get my location etc…On my Google account all permissions is granted! I guess it must be a setting in Raspbian?
Please help!
Hi, when you ask Google to tell you your name it will tell you about the permissions. This should trigger something on you phone (assuming you have a Google account on your phone) and it will prompt you to change some settings in the app. I didnt run into any problems so it isn’t something I have had to troubleshoot.
Great work, I have got it running and now I wonder how to change the Assistant language. Can you help me?
Hi, i install aiyprojects-2018-08-03 image to raspberry pi 3B+.
I doing step by step following your tutorial.
after run command: sudo service pi-assistant start
everything ok.
but when i reboot raspberry pi.
nothing response when i say “Ok google” or push button
Hi,
i want to use this together with my smart mirror.
My question is how you can burn the pi´s operating system and the aiy image on the same sd card???
The operating system is the same, the AIY image just has all of the code preloaded along with it’s dependencies. These instructions seem to detail installing the Google Assistant over Raspbian – https://github.com/t1m0thyj/AssistantPi
The audio input is way too low….Google assistant can hardly hear when I say hey Google…..but when I about hey Google it definitely works…lol
how do i configure it without internet. simply just respond me a one question i ask..?
I don’t think you can I am afraid.
Hi David, please I need a step by step explanation how to add a led to the assistant feddbak response, I read what you response Alim, But..I don’t understand, Im new in Rpi. thanks a lot
Hi David im a Uni student and i really loved the video, i’ve been trying too do this for months and yours does seem the best way. But i have found a problem with the mic, it doesn’t pick anything up i have it turned up to max on both volume control and alsamixer. I would really love to hear back from you and your thoughts. Thanks
So, I need to use my headphone jack for my speaker, but it seems this install has removed that card..? How can I get it back in there?
Here’s all I’m seeing:
pi@raspberrypi:~ $ cat /proc/asound/cards
1 [Headset ]: USB-Audio – Logitech USB Headset
Logitech USB Headset Logitech USB Headset at usb-3f980000.usb-1.3, full speed
I know it works with other installs.
Thanks
Good day, I seem to have a problem:
when I run the command sudo nano /usr/share/alsa/alsa.conf the file opens but it stops at “/cards/aliases.conf” therefore I can not see the default things. The previous files I opened to paste this code
options snd-usb-audio index=1
pcm.!default {
type hw
card 1
}
ctl.!default {
type hw
card 1
}
was empty
Hell o David…..My partner and I are doing our final project for both my College Electronic Engineering program and his Computer Engineering program. We have built a working amplifier and are attempting to incorporate a touchscreen GUI interface similar to your YouTube “Rune, Audio Player with a Raspberry Pi – Sponsored by Reichelt”. We purchased the Raspberry PI 4 with 4 Gb of RAM, but weeks later realized that it did not have many compatible options. We just purchased a Raspberry PI 3 Model B and we still are having no luck. We have about 3 weeks to try to get this part going, so any help sooner than later would be life saving.
Any advice, support, instruction, coaching or referrals would be greatly appreciated. We are from Canada so if there is a possibility to arrange for some communication or consulting please email us with some contact information.
Thank you and we hope to hear from you.
Hello, I got this error, could you help?
INFO:root:Press button to start conversation…
INFO:root:Conversation started!
INFO:aiy.assistant.grpc:Recording started.
aplay: playback:2787: read error
INFO:aiy.assistant.grpc:Recording stopped.
Traceback (most recent call last):
File “src/examples/voice/assistant_grpc_demo.py”, line 57, in
main()
File “src/examples/voice/assistant_grpc_demo.py”, line 54, in main
assistant.conversation()
File “/opt/aiy/projects-python/src/aiy/assistant/grpc.py”, line 190, in conver sation
keep_talking = self._assist(recorder, wrapped_play, deadline)
File “/opt/aiy/projects-python/src/aiy/assistant/grpc.py”, line 135, in _assis t
for response in self._assistant.Assist(self._requests(recorder), deadline):
File “/usr/local/lib/python3.5/dist-packages/grpc/_channel.py”, line 363, in _ _next__
return self._next()
File “/usr/local/lib/python3.5/dist-packages/grpc/_channel.py”, line 357, in _ next
raise self
grpc._channel._Rendezvous:
Thanks a lot. I saw AIY in Google, searched AIY components, it cost around 37500 rupees for voice hat, and 1200 rupees for raspberry Pi zero. Total more than 5000(37500+1200+others),so I dropped the plan today. After seeing your post I got hope. I can create DIY Google Assistant.
Thank you
**************************************
raceback (most recent call last):
File “src/examples/voice/assistant_grpc_demo.py”, line 57, in
main()
File “src/examples/voice/assistant_grpc_demo.py”, line 49, in main
language_code=args.language)
File “/home/pi/AIY-projects-python/src/aiy/assistant/grpc.py”, line 258, in __init__
super().__init__(language_code, volume_percentage)
File “/home/pi/AIY-projects-python/src/aiy/assistant/grpc.py”, line 94, in __init__
credentials = auth_helpers.get_assistant_credentials()
File “/home/pi/AIY-projects-python/src/aiy/assistant/auth_helpers.py”, line 151, in get_assistant_credentials
return _try_to_get_credentials(credentials_file)
File “/home/pi/AIY-projects-python/src/aiy/assistant/auth_helpers.py”, line 123, in _try_to_get_credentials
credentials = _credentials_flow_interactive(client_secrets)
File “/home/pi/AIY-projects-python/src/aiy/assistant/auth_helpers.py”, line 75, in _credentials_flow_interactive
webbrowser.register(‘chromium-browser’, None, webbrowser.Chrome(‘chromium-browser’), -1)
TypeError: register() takes from 2 to 3 positional arguments but 4 were given
***********************************************
I got this error when I ran `src/assistant_library_demo.py`
google voice kit error
help me pls